

Clarius is partnering with MSK ultrasound Imaging pioneer Greg Fritz, PT, DPT, RMSK, to deliver online presentations to help clinicians update and refine MSK imaging skills.
By Greg Fritz, PT, DPT, RMSK
The field of radiology has several imaging devices to visualize different body tissues for the diagnosis and follow-up of patients.
The most commonly used techniques are CT scans, MRI, ultrasound, and plain X-rays. Over the year, each of these imaging techniques gained popularity in a specific field of medicine.
For instance, MRIs are commonly associated with scanning the brain and spinal cord, while ultrasound utilizes soundwaves to visualize the thoracic and abdominopelvic regions, especially in pregnant women. However, doctors and patients rarely connect ultrasound to musculoskeletal imaging in the fields of orthopedic surgery and physical therapy. For this reason, I decided to clear out some ideas about the use of ultrasound in my line of work.
Common imaging modalities
Summation imaging
As you can see in figure 01, summation imaging focuses on generating one single image that sums up different organs and tissues in the field of the X-ray machine.

Figure 02 depicts an X-ray image of the shoulder joint, where there is an overlay of the coracoid process on the humeral head.
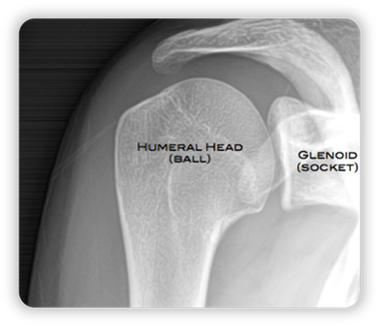
If you focus on the X-ray image, it might occur to you that the coracoid process goes through the articulation, but in reality, it is in front of the other structures.
Example:
Imagine that you are pointing the X-ray machine towards a room that has different objects, including a couch. Behind the couch, there is a small chair.
Once you obtain the X-ray image, you will see that the couch and the chair overlie, which might give you a false sense that the latter is inside the former.
Real-life example:
To explain this concept further, let’s see a real-life example of a left knee X-ray image (figure 03):
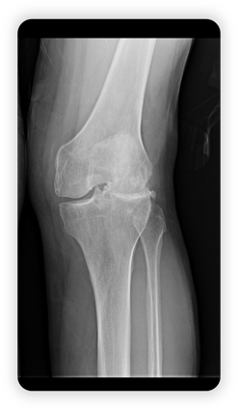
As you can see, the right plateau has some space, which depicts the articular cartilage of the knee joint. On the other side of the image, the left plateau looks completely degenerated.
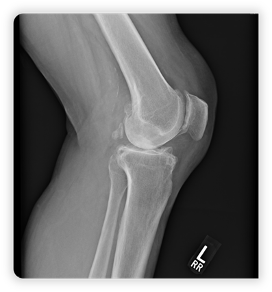
When we look at the joint from another angle (figure 04), the anterior side of the tibia could be the reason for the density noted in figure 03. In other words, the angle by which the X-ray image was obtained tricked us into thinking that the joint has undergone cartilage degeneration.
Tomographic imaging
Tomographic views are obtained using CT, MRI, and ultrasound. Figure 05 showcases how tomographic views take specific images at each slide, which prevents the overlying seen in summation imaging.

Example:
If you consider the previous example (couch and chair) and take the image using tomographic viewing, the chair will not appear on the first slice image, but the couch will have a much better resolution.
Real-life example:
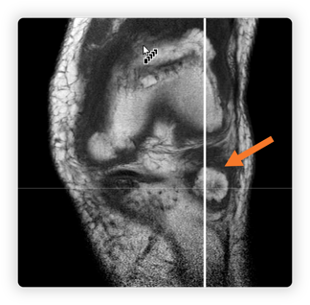
When we take our patient from the previous example, you can see that the MRI tomography provides more information about the bony and articular structures of the patient’s knee, which are shown in figure 06,07,08.
- Figure 06 – a coronal slice of the patient’s knee.
- Figure 07 – this is the sagittal view that’s depicted with a vertical line in figure 06. This slice showcases a bony horn (osseous projection) that was not visible in plain images.
- Figure 08 – axial view of the osseous projection (depicted by the orange line in figure 07).

Musculoskeletal ultrasound
As mentioned before, the musculoskeletal ultrasound belongs to tomographic imaging techniques. For instance, figure 09 represents a woman with an emphasis on her shoulder; the blue line will be the direction of moving the ultrasound probe.

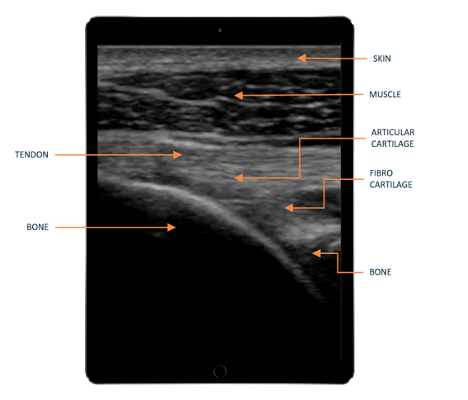
If we take a look at the generated ultrasound image, we can see that every tissue is separated, as shown in figure 10.
The resolution and degree of accuracy of different tissues produced by ultrasound exceed in many cases, MRI tomography, which is something that most clinicians find hard to believe. In addition to all the details shown by ultrasound, it can give us a live feed that shows how muscles and tendons move during contraction and relaxation.
The next video (video 01) displays the different structures of the shoulder articulation of the woman from figure 09.
If you focus on the dynamic black line, you can visualize the articular cartilage, which is an extremely beneficial feature as it allows physicians to determine whether or not there is any cartilage degeneration.
These high-resolution images that get produced by mere sound and compete with other cutting-edge imaging techniques (e.g., MRI, CT scan) make ultrasound one of the most fascinating devices in the field of radiology.
The physics of musculoskeletal ultrasound
As you can see in figure 10, the probe sends wave sounds depicted by blue arcs, which interact with an object (orange arc), and then echo back to the probe sensors.
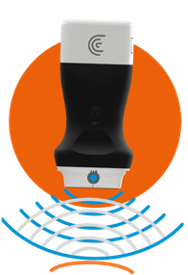
Based on the frequency and intensity of the returning echoes, the ultrasound machine interprets them to generate a slice image of the scanned tissue. (figure 11)
One key point about the physics of ultrasound is that the higher the frequency, the shallower the image we get, and the lower the frequency, the deeper we can image the tissues.
The attenuation of sound
Despite the wide uses of ultrasound imaging, some structures of the body do not reflect decent images that are of clinical significance.
This concept is referred to as the attenuation of sound, which is the direct result of how well sound is able to travel through different milieus. For instance, ultrasound shows poor imaging qualities when the tissue has a lot of air. Consequently, the lungs are not the best organ to be scanned by ultrasound. Moreover, the bones also have a higher rate of sound attenuation due to the tiny sacs of air found in the osseous tissue (figure 12).
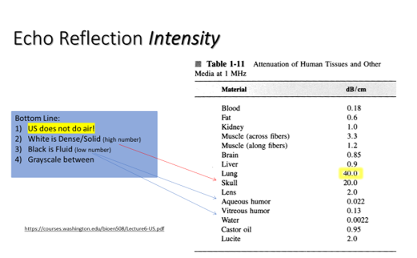
On the other end of the spectrum, water has an attenuation rate of 0.0022, making it one of the best milieus for sound to travel through.
Echotexture
Figure 13 demonstrates an X-ray of the lateral aspect of an ankle with a fixated plate.
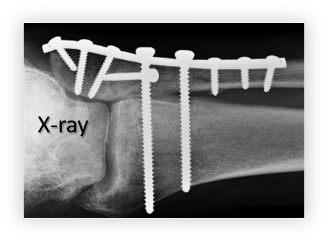
As I take look at the same ankle using ultrasound (figure 14), you can see that it shows the top side of each screw on the plate. Below those characteristic shapes, you can also see a particular signature of metal known as ring down.
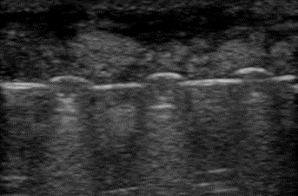
When I play video 02, you can see all the screws on the ultrasound, as shown in the previous X-ray except for the deeper ones. This is due to the density of the metal.
Another example to demonstrate bony echotexture is displayed in video 3, which is an ultrasound recording that starts from the distal phalanx until it reaches the distal radius, showing everything in-between (e.g., flexor tendons, middle phalanx, proximal phalanx, metacarpal head, carpal bones).

As a general rule, the tissues that are filled with fluid show a dark image on ultrasound, which is also referred to as an anechoic image.
Examples:
Figure 15 shows an 80-year-old man who injured himself during a tennis match when he was running backward and hit the chain-linked fence.
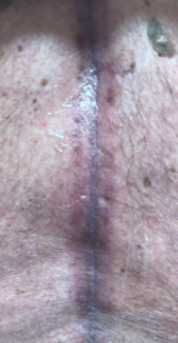
As I palpated his thoracic spine (video 04), you can see that my hand is generating waves of fluids, suggesting a subcutaneous effusion.
When I used the ultrasound machine, video 05 was produced, depicting the skin on the right and the fluid on the left as an anechoic image.
Another example of fluid structures that are excellent milieus of sound transmission is the bladder (video 06). In fact, OB/GYNs insist that patients drink large amounts of water before getting a pelvic ultrasound to improve image quality.
The final example is a rotator cuff repair that hasn’t properly healed (video 07).
In summary:
- Fluids and tissues that allow for sound to travel freely display a dark (anechoic) image on ultrasound.
- Metal has a specific signature known as a down ring.
- Bone appears as a white line on ultrasound.
Tissue-specific echotextures
If you take a look at figure 16, you can see different structures of the heel (e.g., calcaneus, Achilles tendons, retro-calcaneal bursa, fat pads).

As I play the recording (video 08), you can see that the location of the calcaneus and retrocalcaneal bursa changes when the patient switches from dorsiflexion to plantarflexion.
However, the purpose of this recording is to show you the different echotextures of non-bony structures.
Fluid in the retrocalcaneal bursa appears dark, which we’ve already covered above. Achilles fibers appear gray-scale, as they’re denser than fluid but less opaque than bone.
The fat pads, on the other hand, appear brighter than neighboring structures, which is referred to as a hyperechoic structure.
Another ultrasound image (figure 17) was taken from my calf, where the upper limit is the skin and fat is just underneath it.
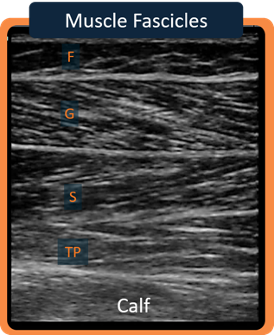
Downward, you can see the gastrocnemius muscle, which is separated by a fibrotic tissue from the soleus muscle. Finally, the posterior tibialis muscle is located underneath.
Again, you can see the gray-scale echotexture that places the muscles and other fibrotic tissues between the anechoic view of fluids and the hyperechoic echotexture of bones.
The final ultrasound recording (figure 18) shows the echotextures of nerves and tendons.
Case study – puzzling pain/limitations
A female patient presented to my office with complaints of right wrist pain, with adhesions from inactivity.
The patient reports that she fell on an outstretched hand 9 weeks ago that made her visit a doctor who had concerns about the wrist mobility.
When I questioned the patient, she said that flexing her wrist joint is accompanied by a burning, sharp pain and that active wrist extension is impossible unless she uses her other hand, which allowed her to reach full extension.
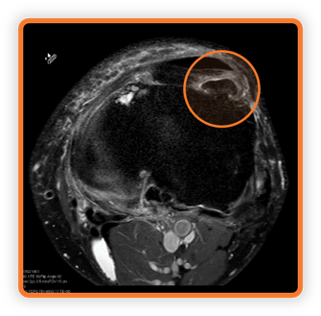
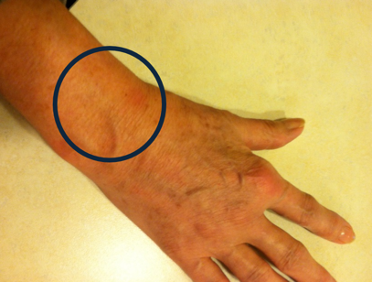
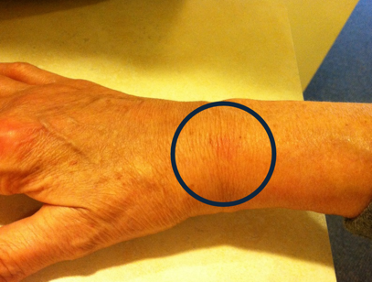
Figures 19 and 20 showcase her hand with the location of the pain depicted by a dark circle.
My approach to this case
As I’m familiar with the potential uses of ultrasound (detecting fluid, bone integrity, inflammation, etc.), I used the probe to scan the short axis view.
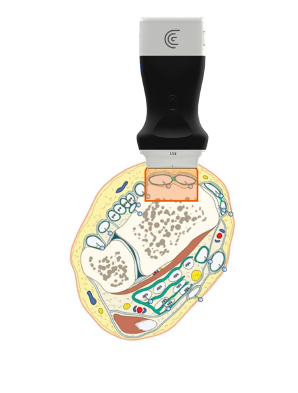
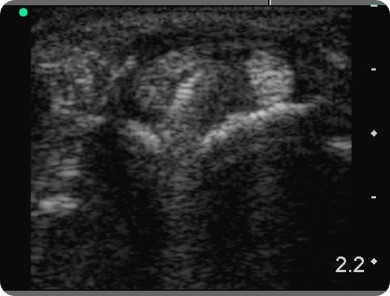
As you can see in figure 21, I placed the probe right above the second compartment, which produced the image shown in figure 22.
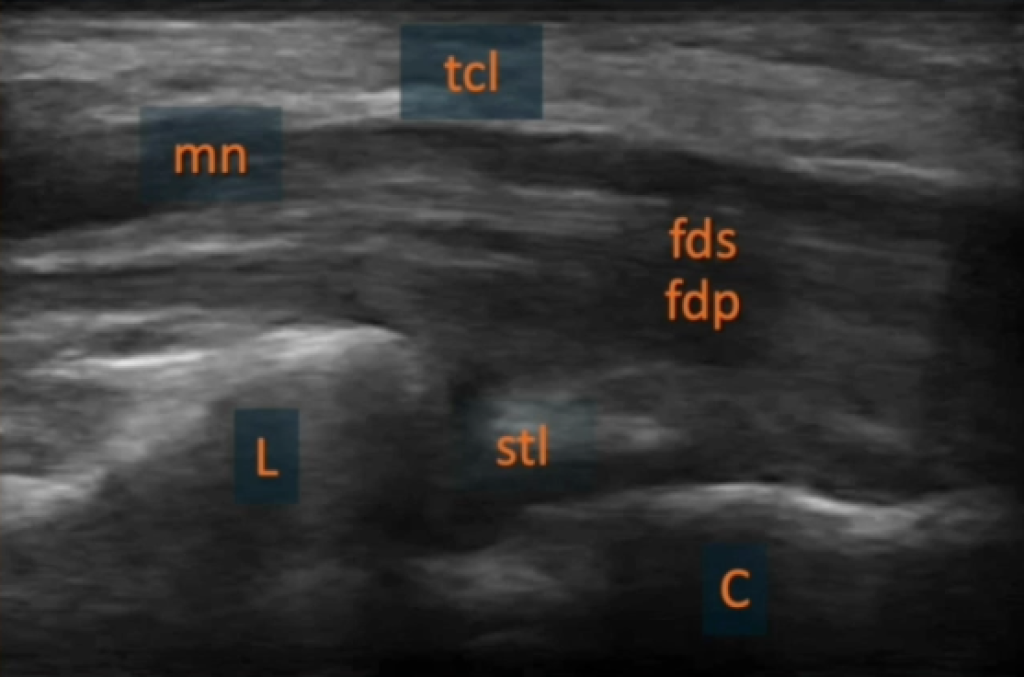
For reference to normal findings, you can take a look at figure 23 of an ultrasound image that displays a healthy wrist.
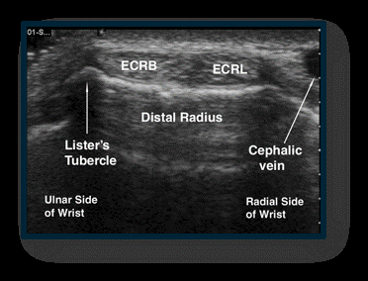
The first thing that got my attention in this patient’s ultrasound was the enlargement of the extensor carpi radialis brevis, whereas the extensor carpi radialis longus had a normal size.
Another interesting finding was the right bright area in the middle of the extensor carpi radialis brevis, with the ring-down sign.
These findings required another view using the long axis, which generated the following image (figure 24):
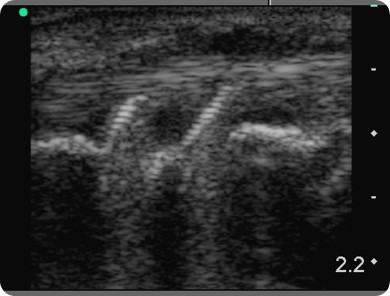
Interestingly, you can see that the distal radius has two metal structures (screws) that go right through it. Above the screws, fluid effusion is clearly apparent, indicating the presence of an inflammatory process.
With the information I gathered from ultrasound imaging, I contacted her orthopedist who removed the screws, which dramatically improved the patient’s symptoms that I didn’t get another visit from her.
Takeaway message
Musculoskeletal ultrasound imaging verifies the integrity of different structures and metabolic processes (e.g., inflammation). It also serves as an objective way to evaluate healing, whether through the resolution of fluid effusion or the reunion of a bone fracture.
In summary, musculoskeletal ultrasound imaging is a fantastic tool that has a lot of untapped potentials, which should be sufficient to include it in your office as part of your physical therapist toolkit.
More about Greg Fritz, PT, DPT, RMSK Greg has more than thirty years of experience as a physical therapist. A student of anatomy and movement science, Greg continues to be fascinated by the human body and his professional interests include musculoskeletal ultrasound imaging in physical therapy, job-site ergonomics, industrial injury prevention, fibromyalgia, TMJ/Jaw pain, balance training and sports/orthopedic rehabilitation.
Greg was one of three physical therapist recipients in the nation who earned a Pioneer Certificate in Musculoskeletal Ultrasound Imaging (RMSK) in Washington State. He believes ultrasound imaging is pivotal in the correct management and diagnosis of many orthopedic injuries. Greg regularly lectures at the University of Washington and trains other interested clinicians in the use of musculoskeletal ultrasound (MSKUS) in their practices. He is on the faculty of a distinguished Regenerative Medicine/Orthobiologics innovator (Don Buford, MD).


